How to Cut Soap Bars Evenly: Tools, Timing, and Pro Techniques
Learn how to cut soap bars evenly with the right tools and timing. Get pro tips on wire cutters, knives, fixing dragging cuts, and beveling for clean bars.

How to Cut Soap Bars Evenly: Tools, Timing, and Pro Techniques
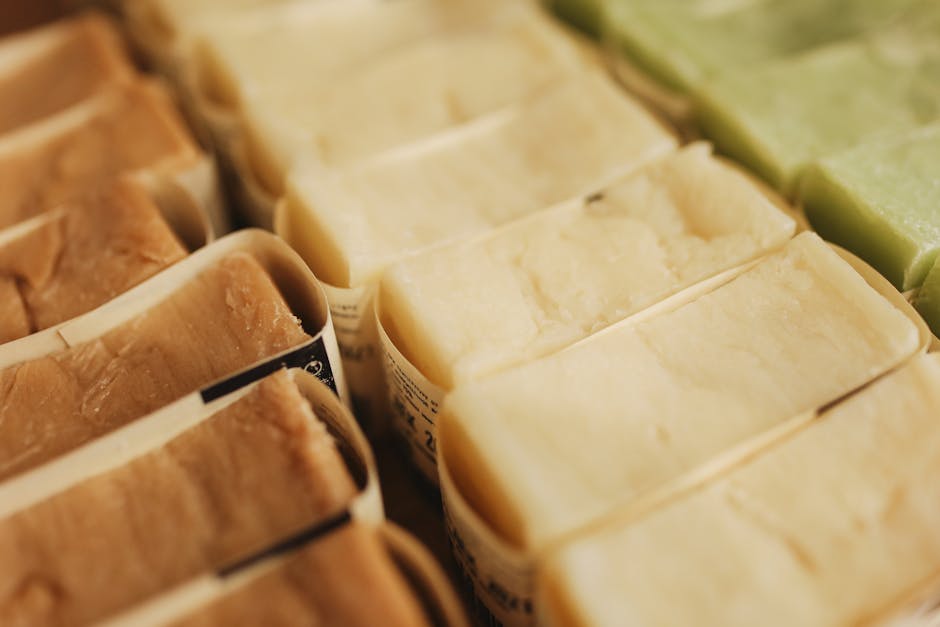
Cut your cold process soap loaf 18 to 36 hours after pouring, when the soap is firm but still slightly soft, using a sharp non-serrated knife or a wire cutter pressed straight down in one smooth motion. Cutting too early gives you sticky bars that drag on the blade. Cutting too late gives you crumbly edges and a workout. The sweet spot is when the surface feels like firm cheese and a fingernail leaves a clean dent.
Cutting is the step that turns a loaf into a product. Sloppy cuts can ruin a beautiful batch, while clean, square bars instantly look more professional even before you wrap them. Whether you're cutting for personal use or building a soap business, the technique below covers every tool and timing question you'll run into.
- When to Cut Cold Process Soap
- Tools for Cutting Soap (Ranked by Use Case)
- Step by Step: Cutting a Soap Loaf
- How to Get Square, Even Bars Every Time
- Common Cutting Problems and Fixes
- Beveling and Planing for a Polished Finish
- Cutting Special Designs and Embeds
- Frequently Asked Questions
When to Cut Cold Process Soap
Timing matters more than the tool you use. The same loaf will cut like butter on day two and like dried clay on day ten. Most cold process recipes cut best between 18 and 36 hours after pouring.
The fingernail test is the simplest check. Press your nail into a corner of the loaf. If your nail leaves a clean indentation with no oily residue and the soap doesn't crumble back at you, it's ready. If it feels soft and smears, give it another four to six hours. If it cracks instead of denting, you waited too long but it's still workable.
A few specific recipes have different windows. Salt bars harden fast and need to be cut at 4 to 6 hours, sometimes sooner. By the next morning they can be hard as concrete. High lard or tallow recipes also firm up quickly and are usually ready at the 12 hour mark. High olive oil recipes like castile soap stay soft for days. You may need to wait 48 to 72 hours before they're firm enough to cut.
Recipes that went through full gel phase are usually firmer at unmolding than ungelled batches. If your loaf was insulated and gelled, check it at 12 to 18 hours instead of waiting a full day.
Tools for Cutting Soap (Ranked by Use Case)
The best tool depends on how often you cut, how precise you need the bars to be, and your budget. Most soapmakers start with what's already in the kitchen and upgrade over time.
Sharp non-serrated knife. A long chef's knife or a French-style bread knife with a smooth edge works for any beginner. The blade needs to be longer than the loaf is wide. Drag-style sawing leaves ugly lines, so press straight down in one motion instead. Pros and cons: free if you already have one, but harder to keep cuts perfectly straight without a jig.
Bench scraper or dough cutter. A flat steel bench scraper presses down evenly across the entire blade and works beautifully for soft to medium-firm soap. The flat edge gives a cleaner cut than a knife because there's no flex. Look for one with a comfortable handle and a 6 inch or longer blade.
Single-wire cutter. A taut wire cutter (think cheese cutter or pottery harp) glides through soap with almost no resistance. Wires don't drag fragrance oils or colorants the way blades sometimes do, which keeps swirl patterns crisp. You can build one for under $20 with a wooden frame and guitar string, or buy a ready-made version from any soap supply shop.
Multi-bar wire cutter (loaf cutter). This is the gold standard for production soapmakers. The frame holds 8 to 12 parallel wires set at exactly the bar width you want, and one downward motion cuts the entire loaf into uniform bars. Brands like Bud's Woodshop and Tank cutters dominate the market. Expect to pay $80 to $300, but the time savings pay off after a few batches if you sell.
Miter box or cutting jig. A wooden box with guide slots holds the loaf in place and tells your knife exactly where to go. This is the cheapest way to get pro-level consistency if you already own a knife you trust. Many soapmakers build their own from scrap wood and a square ruler.
Soap planer or beveler. Not a cutter exactly, but the finishing tool that turns rough bars into smooth ones. Covered in the beveling section below.
Step by Step: Cutting a Soap Loaf
Once your loaf passes the fingernail test, the actual cutting takes about five minutes for a 2 to 3 pound batch.
1. Unmold carefully. Pull silicone away from the soap on all four sides before flipping. If you're using a wooden mold, pull the liner straight up so you don't tear the surface. Place the loaf on a clean cutting board with the prettiest face up.
2. Mark your cuts. Decide your bar thickness first. Most handmade bars are between 1 and 1.25 inches wide. Use a ruler and a toothpick or a knife tip to score light marks across the top of the loaf. Skipping this step is the most common reason beginners end up with bars of mixed thickness.
3. Position and cut. Set your blade or wire on the first mark. Press straight down through the loaf in one motion. Don't saw. Sawing drags soap along the edge and creates visible blade marks, especially in swirled batches. If you're using a knife, your dominant hand pushes down while your other hand rests flat on the top of the blade for even pressure.
4. Wipe between cuts. Soap batter, especially fresh batter, builds up on a blade fast. Wipe with a paper towel between each cut for cleaner edges. Wire cutters need less wiping, but a quick swipe still helps.
5. Inspect each bar. Set bars on a cutting board with space between them. Look at each one for soda ash, dragging marks, or thickness variation. Bars under 0.8 inches are too thin and will dry out fast. Bars over 1.5 inches feel chunky in the hand and won't lather as well.
6. Move to the curing rack. Stand bars on edge for airflow on all sides. Six to eight weeks of cure time gives the best lather and longevity. See our curing guide for the science behind why it matters.
How to Get Square, Even Bars Every Time
Three habits separate amateur cuts from pro cuts: measuring, perpendicular pressure, and consistent timing.
Measure twice. A digital caliper or a metal ruler is worth the $5 to $10 cost. Mark every bar position from the same end of the loaf, not bar by bar. If your loaf is 9 inches long and you want 1 inch bars, mark at 1, 2, 3, 4, 5, 6, 7, and 8 inches. Doing it this way prevents accumulated drift where your last bar ends up half the size of the first.
Press perpendicular. A 5 degree tilt over a 3 inch loaf height means a quarter inch of variance from top to bottom. That's the difference between a sellable bar and a wonky one. If you're cutting freehand, stand directly over the loaf so your shoulder, elbow, and wrist line up with the cut. Keep your wrist locked.
Use a guide for high-stakes batches. If you're cutting a batch for a craft fair or a custom order, set up a simple miter jig. Two parallel wooden rails on either side of the loaf, plus a square block to slide your knife against, will get you bars within 0.05 inches of each other.
Match cut day to recipe. Get to know your recipes. A 30% coconut recipe with low water will be ready at 16 to 20 hours. A heavy olive oil recipe might need 48 hours. Keeping a simple log of which recipes cut best at which time saves rework later.

Common Cutting Problems and Fixes
Even with the right tools, you'll run into surface defects. Here's how to diagnose what's happening.
Drag marks across the bar face. The blade is pulling soap as it moves through. Causes: soap is too soft (wait another 12 hours), blade is dirty (wipe between cuts), or you're sawing instead of pressing. If you must use a serrated knife, lighten pressure and let the teeth do the work.
Crumbly edges. Soap is too hard or too dry. Cutting fresh from the mold reduces this. If the loaf is days old, mist the cut faces lightly with water to soften them, wait 10 minutes, then cut. High coconut recipes are notorious for this.
Bars wider on top than bottom. Your blade is tilted. Stand directly above the loaf, lock your wrist, and watch your starting angle. A square ruler held against the side of the loaf as a visual reference helps.
Bars stick to the blade. Fresh batter is still releasing fatty acids that grab onto steel. Wipe your blade with a tiny bit of olive oil before the next cut. The thin oil layer breaks the suction.
Wavy or curved cuts. Sawing motion or a flexible blade. Use a stiff, non-flexing blade or a wire stretched taut.
Bars stuck to each other after cutting. Soap is still warm and slightly tacky. Move bars to the curing rack as you cut. Don't stack fresh-cut bars on top of each other.
Soda ash on the cut faces. The exposed inner soap reacts with carbon dioxide as it cures. To minimize, you can steam each bar lightly with a garment steamer or wrap loosely in plastic for the first 48 hours of cure. See our soda ash prevention guide for more options.
Beveling and Planing for a Polished Finish
A raw-cut bar has sharp 90 degree edges. Beveling shaves those edges down for a softer feel and a more polished look. It's not required, but it's one of the easiest upgrades for selling soap.
Vegetable peeler bevel. A standard Y-shaped vegetable peeler shaves a clean 45 degree bevel along each edge. Hold the bar steady and pull the peeler from one corner to the other in one stroke. Light pressure prevents tear-outs.
Single-blade soap planer. A dedicated tool with a fixed blade depth (similar to a cheese plane) shaves off the top layer of a bar to remove soda ash, smooth ridges, or fix slight inconsistencies. Especially useful for restoring uniformity to a batch where some bars cured with bumpy tops.
Crinkle cutter. A wavy-edge cutter gives bars a decorative crinkle face. It's a one-second upgrade that makes bars look distinct on a craft fair table. Be sure to use a stainless steel one designed for food, since it touches lather every time someone uses the bar.
After beveling, gently rub each bar with a clean paper towel to remove loose shavings. Save the shavings for rebatching later.
Cutting Special Designs and Embeds
Decorative bars need a more careful approach.
Layered soap. Cut layered loaves at the soft-firm stage so layers don't separate at the boundary. A wire cuts through layered bars more cleanly than a blade since there's no drag between different colored layers. See our layered soap guide for pouring techniques.
Embeds. If your loaf has embedded shapes (hearts, stars, decorative chunks), plan your cuts so each bar gets a full embed in the center. Mark the loaf based on embed spacing, not even spacing. A bar with half an embed at the edge looks unfinished.
Swirled batter. Cuts on swirled bars reveal the design. Cutting from different directions (top down vs side to side) shows different views of the swirl. Cut a test bar from each end of the loaf before committing to all of them, since one orientation usually shows the design better.
Round bars or specialty shapes. Use cookie cutters on rolled-out hot process batter, or pour individual cavity molds instead of loaves. Trying to cut perfect rounds from a loaf is a frustrating losing battle.
💬 Frequently Asked Questions
How long should cold process soap sit before cutting?
Most cold process soap is ready to cut 18 to 36 hours after pouring. Salt bars need to be cut at 4 to 6 hours before they harden into bricks. High olive oil recipes like castile may need 48 to 72 hours. The fingernail test (press a nail into the loaf, look for a clean dent without smearing) is the most reliable indicator.
What is the best tool to cut handmade soap?
For beginners, a long non-serrated knife or a steel bench scraper is enough. For consistent cuts at scale, a multi-bar wire cutter pays for itself fast. A taut single wire on a frame gives the cleanest faces and the least drag on swirled designs. The tool matters less than timing and perpendicular pressure.
Can you cut soap with a wire?
Yes. A taut wire is one of the best cutting tools for cold process soap. It glides through with almost no resistance, leaves a clean face, and doesn't drag colorants the way a knife sometimes does. You can buy purpose-built soap wire cutters or build one from a hardwood frame and a length of guitar wire or stainless steel wire.
Why does my soap crumble when I cut it?
Crumbling usually means the soap is too dry or was cut too late. Common causes: a high water discount, high coconut percentage, or letting the loaf sit four or more days before cutting. To salvage, mist the cut face lightly with water and wait 10 minutes for the surface to soften, then re-cut. Future batches can be cut earlier or formulated with a slightly higher water content.
Do you cut soap before or after curing?
Cut before curing. Curing happens after the bars are cut so air can reach every face, which is what evaporates the water and hardens the bars. Cutting a fully cured 6 week old bar is possible but much harder and tends to crack the soap. The standard sequence is: pour, wait 18 to 36 hours, unmold, cut, then cure for 4 to 6 weeks.
Run the Numbers, Then Cut With Confidence
Clean cuts start before you ever pick up a knife. A balanced recipe with the right water content and superfat hardens evenly, releases from the mold cleanly, and slices like butter at the 24 hour mark. A poorly balanced one fights you every step of the way.
Plug your next recipe into the Soaply calculator to get lye, water, and superfat dialed in before you pour. The right numbers up front make every step that follows, including cutting, a lot less stressful.
Ready to Try It?
Use our free soap calculator to create your perfect recipe with real-time property predictions.
Open Calculator